If you plan to install pavers, make a scaled drawing to help with the layout. Also, check with the local utilities locate service to ensure that you don’t hit or obstruct pipes or cables during construction.
Start with a layer of coarse, crushed stone base and pour a bed of sharp-angled bedding sand over the entire area. Use a level to maintain straight rows and occasionally tamp down the sand.
Laying the Base
The paving base is the foundation of your paver project. It helps to keep your pavers in place, allows for drainage and is essential for a successful hardscape installation. A paver surface without a solid base will shift and eventually break apart. There are many different types of paver bases, each designed to suit a specific use or environment. For example, crushed stone is an excellent option for high traffic areas while sand works best for pedestrian projects.
After excavating the space and removing existing materials, you’ll install and compact the base layer in 2-4” layers. The amount of base required depends on the size and type of paver used, as well as the soil conditions. For example, wet and clay soils may require more excavation and a thicker base material than dry or sandy soils.
Once the base is laid, it’s time to add the bedding sand. This sand is similar to beach sand but is sharp and angular. This will help the sand lock into the joints between your pavers, creating a strong and durable surface.
Before you begin laying the sand, you’ll need to mark out your paved area with stakes and string. This gives you a reference point for when you’re installing the pavers and allows you to see how your project will look once it’s complete. You’ll also want to make sure to mark off utility lines in the area you’re working. This is a good idea for any type of construction or landscaping project, but is particularly important for paver installations. You can find information on locating buried pipes and cables by calling 811.
After marking the paver area, pour in your bedding sand. You can purchase sand bags but it’s usually easier and cheaper to have bulk sand delivered and spread on site. Use a screed board or other device to drag over the sand and smooth it out. This step is important to ensure that the sand is perfectly flat and even, and ready for the pavers.
While you’re working, it’s important to tamp the sand and base material regularly with your plate or tamper. This will ensure that there are no air pockets, which can cause the paving stones to shift later on and lead to sunken or raised pavers.
Preparing the Sub-Base
The first step in a hardscape installation is to excavate the soil that will be used for the base of the pavement. It’s important that this step is done correctly to avoid failure in the future. This is because any structure, including a paver patio, walkway or driveway, is only as good as its foundation. During this stage it’s important to check with your local utility company before digging, so you can avoid striking buried gas, water or electrical lines.
Once the excavation is complete, it’s time to install a layer of aggregate and then a layer of bedding sand. The exact amount of each material you need will depend on the type of paving project you’re working on. For example, patios only need 6″ of aggregate base, whereas residential driveways require 10″. Use a wheelbarrow or dump truck to deliver the appropriate amount of material and spread it evenly with a landscape rake or trowel. Then, use a plate compactor to compact the material. Make sure to wear work gloves, safety glasses and hearing protection when using a plate compactor.
In most cases, it’s necessary to add a geotextile fabric to the top of the aggregate and sand layers before proceeding with the paver installation. This is because the fabric will help prevent weed growth and allow for proper drainage. Once the geotextile is in place, a sand bed is added to the surface of the base, and then the paver stones are laid on it.
During the laying process, it’s also recommended that you use a plate compactor to secure each paver in place. This will ensure that the pavers stay firmly in place, and it will also minimize any movement between each one.
It’s also a good idea to install edge restraints, such as concrete, edging stones or plastic paver edging products. These are designed to keep the pavers in a stable position and will prevent them from moving or separating over time. If you’re working on a large paved area, it’s also a good idea to lay a layer of road base aggregate at the bottom of the sand bed to help prevent any settling.
Laying the Pavers
Whether you’re installing a patio, walkway or driveway, the first step is the same: dig out any existing material to the appropriate depth. It’s a good idea to use stakes, marking paint or a garden hose to outline your work area as you dig. This makes it easier to keep the excavation tidy and helps prevent you from digging into your utilities or pipes.
Once the excavation is complete, spread and compact your paver base to a thickness of about four inches. You can rent a plate compactor to make the process much quicker and easier, but it’s important to wear protective gear to avoid a back injury or hearing loss. Also, only take partial shovel loads and always lift from your legs. Be sure to tamp each layer down, and remember that the base should have a slight slope. This allows water to run off the surface, rather than pooling.
Next, lay a layer of sharp angled bedding sand over the entire paver base. This sand isn’t the same as beach sand and has a rougher texture, which is perfect for locking into paver joints. It’s important to follow the manufacturer’s instructions regarding the amount of sand you should use. Too little and the pavers will move around, too much and they will become slick underfoot.
When you’re ready to begin laying the pavers, it’s helpful to use a tape measure and a square to ensure that your project is square. This will help prevent the pavers from settling unevenly over time and it will also keep them looking their best.
Begin laying the pavers one at a time, using a level to check their positioning and making any necessary adjustments. After each paver is laid, fill in any gaps with more coarse bedding sand. Be sure to leave a space for the edge restraints, which should be placed at each corner of the paving area.
Once all of the pavers are in place, a final layer of bedding sand should be added and tamped down to lock in the new surface. After the sand is tamped, a paver sealer can be applied to protect the new surface from weathering and staining.
Finishing the Pavers
As with any paving project, it is very important to take the time to carefully plan the work. It is recommended that you use a tape measure to help plot out the area you are going to resurface and note its square footage. Then, purchase 10% more pavers than your estimate to account for breakage and replacements. Before starting any excavation, it is a good idea to check with the local utilities company by calling 811, also known as 1-800-889-7627. This will allow them to come out and mark the areas where there are pipes and cables. This will protect you from accidentally striking and damaging them during construction.
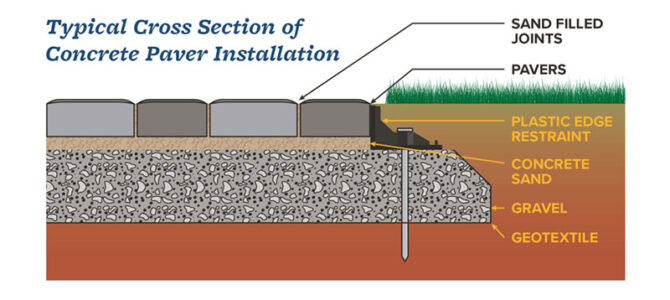
Once the base is excavated, it is tamped and leveled to ensure proper drainage. Then, a layer of gravel is placed to protect the granular base from being contaminated by clay-like soils that can cause problems later on. A layer of sand is then placed on top of the gravel. It is very important that this sand is not packed down and is spread out evenly over the entire surface. It should be within 1/8″ of the top of the pavers if they have a bevel on them. This will ensure that the sand is not even with the top of the pavers and allows for proper “lock up” of the joints.
Next, the pavers are laid. Start at one edge and work toward the other. Set them lightly on the sand and do not press or hammer them in. Every 4 feet pull a string line across the laying face of the pavers to maintain straight lines. If a paver needs to be cut, use a diamond blade wet saw or a paver splitter and cut it to the desired size. Finally, install an edge restraint around all edges that do not butt up to a permanent structure like a wall or kerb.
Once the paving is finished, sweep a light coating of joint filling sand over it. This will help to further prevent lateral movement of the pavers and sand bedding. It is also a good idea to run a plate compactor over the surface once it has been swept. This will help to set the pavers into their bedding sand and further enhance the interlock between them.